
Is it possible to build a real estate website (all by yourself) which
- has SEO friendly web design,
- can display manually updated property listings with an attractive layout and design,
- features MLS-IDX integration (if you are a realtor in the U.S.A.),
- needs no technical expertise to set up,
- is easy-to-maintain,
- is easy to scale up (can handle any spikes in traffic),
- can be built on a shoe-string budget,
- is built on the world’s most popular content management system (CMS) which is undoubtedly WordPress,
- and can generate and capture property buyer and seller leads?
The answer is a resounding YES.
I have seen many real estate professionals waste thousands of dollars on building ‘so-called custom-designed websites’ which you can set up on your own in less than 30 minutes. In fact, we recently analyzed 1365 top ranking websites of individual real estate agents, brokers and agencies (not sites such as Zillow and Trulia) and found that these websites are using many free SEO and lead generation tools that most real estate web design agencies charge a hefty amount of money for (up to $400/month). Based on these findings, we built some SEO-friendly and conversion-optimized website themes (you can request a demo here). These themes have all the features commonly found in high ranking websites and you don’t have pay a monthly-fee.
In this guide, I will explain the step-by-step process that you can follow to build your website on a low budget.
Table of Contents
4 tools you need to build your real estate website
Let’s first discuss what tools you need to build a real estate website on WordPress platform:
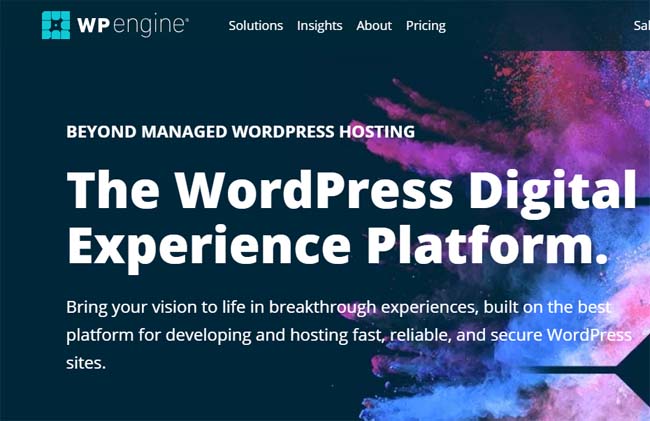
Tool#1: Web hosting: WP Engine or BlueHost
In a recent article, I discussed three best web hosting services for real estate websites. I will explain how to build a site using each one of them.
You should choose WPEngine, if you expect a lot of traffic to your website and want world class security (The cost is approximately $35 per month.
Click here to check out WP Engine plans.
You should choose BlueHost if you want to launch a starter – low-budget website or a single-property website with great performance and world class security (approximately US$3.9 per month.
Click here to check out BlueHost plans
You will be able to update your hosting plan any time you want.
For the purpose of this article, I am going to explain how to set up your real estate WordPress website with WPEngine and BlueHost.
WPEngine provides only WorPress hosting, so the entire website building process is quite intuitive and easy-to-follow.
BlueHost is the world’s most popular hosting brand and you should definitely host your website on Bluehost if you are launching a starter website.
Tool#2: Domain name: Godaddy
BlueHost offers free domain name with all its hosting plans, while you need to buy one if you are going with WPEngine.
GoDaddy is one of the most popular domain registrars. Click here to buy a domain with GoDaddy.
Domain name is basically the address which your users will type in a browser to access your website.
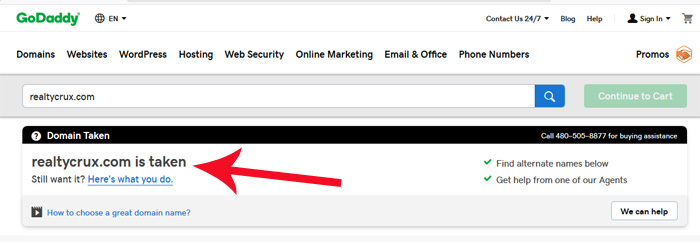
For example, ‘realtycrux.com’ is the domain name of my website.
Visit GoDaddy.com and first search for a domain name to ensure that it is available.

You need to keep searching for a suitable domain name until you find the one that rightly represents your brand and is available. For example if you search for ‘realtycrux.com’, GoDaddy will tell you that it’s been already taken.
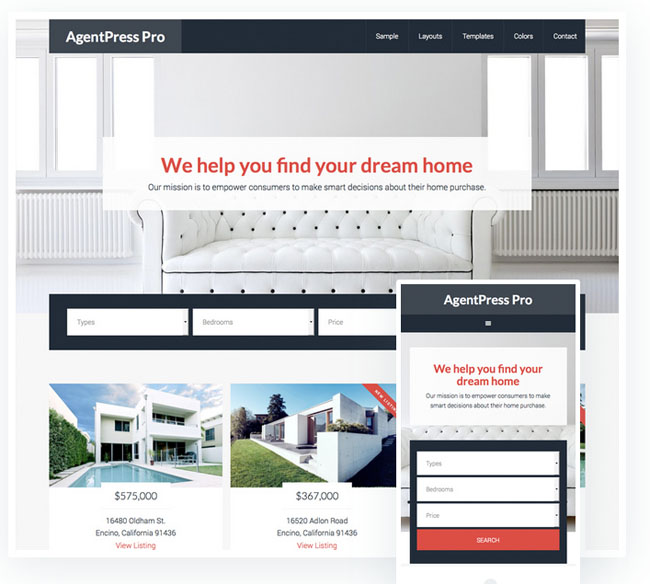
Tool#3: Real estate website theme: AgentPress Pro Theme
When you are building your site with WordPress, you can use a pre-designed website theme. For real estate professionals, I recommend AgentPress Pro by StudioPress.
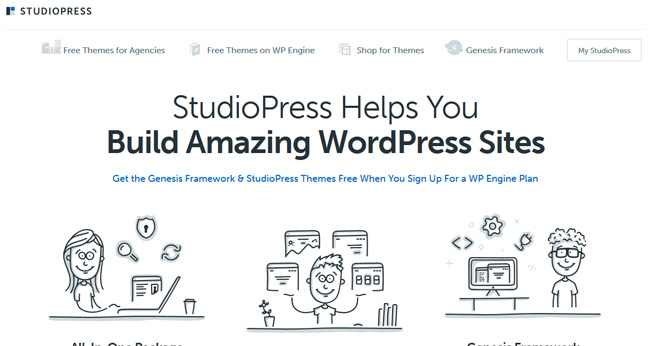
If you purchase a WPEngine hosting plan, you will get all themes of StudioPress free of cost. Know the full details here (WPEngine has acquired StudioPress).
If you purchase BlueHost hosting plans, you will need to buy Genesis Framework and AgentPress Pro theme from StudioPress.. It will cost you roughly $100 (one-time payment).
Tool#4: IDX integration tool
There are many MLS IDX integration tools.
One of the best ones I believe is Realyna.. Click here to buy Realtyna MLS IDX integration plugin for WordPress.

Now that you have all the tools required for building your site, let’s get started:
Building real estate website with WP Engine
WPEngine makes it extremely easy to launch a WordPress real estate website. A basic set-up takes just a few clicks. Here is how:
-
WordPress Installation
Visit this page to buy a hosting package from WPEngine.
Buy the ‘StartUp’ package which offers the following features:
- Genesis Framework
- About 40 WordPress themes including two themes designed for real estate professionals. These are AgentPress Pro
- Global CDN
- SSL certificate (if your site has SSL certificate, it will begin with ‘https’ instead of http)
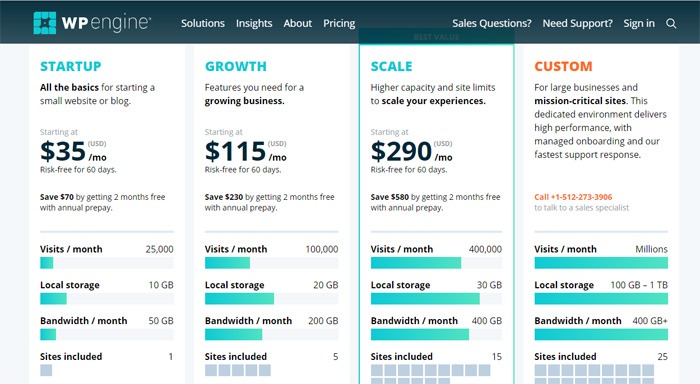
The most important thing to note here is that Genesis Framework and AgentPress Pro theme comes bundled with the package. It means that you won’t have to buy them separately. As already mentioned, they cost about $100 if purchased separately.
When you click ‘Get Started’ button at the bottom of the plan, you will be able to set up your WPEngine account on the next page.
You can opt for either annual plan or monthly plan.
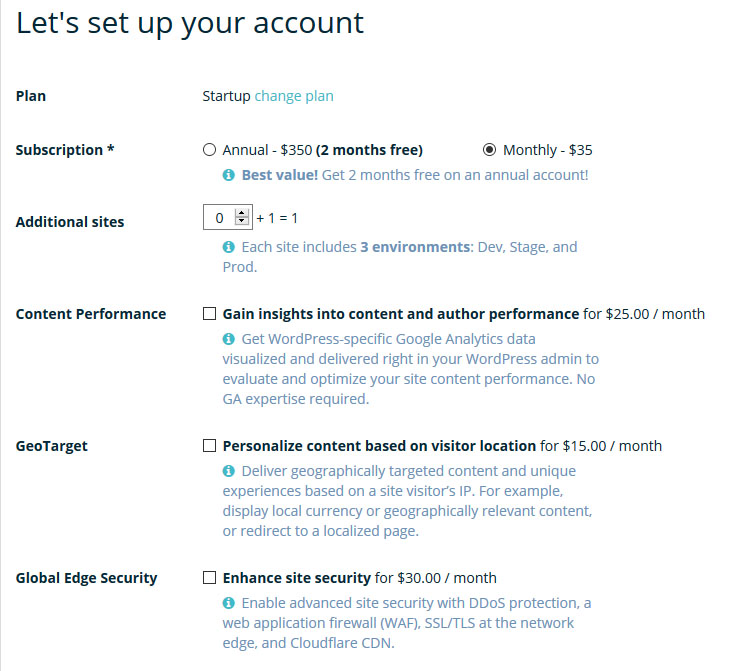
There are some other paid add-ons such as ‘Additional Sites’, ‘Geo Targeting’, ‘WordPress Multisite’ which you can ignore at the moment.
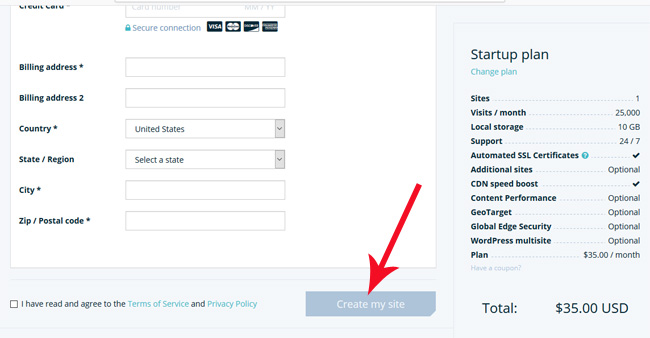
Fill in your billing info and click ‘Create My Site’ button.
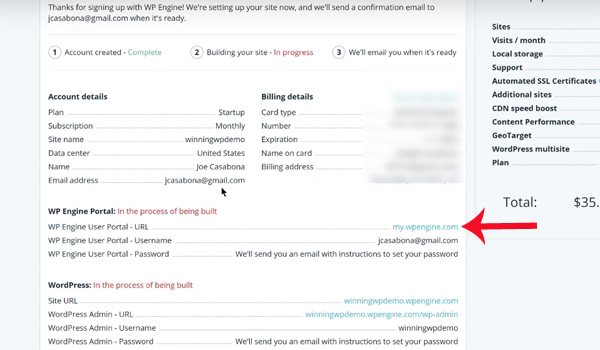
Once the payment is successful, you will be directed to a page where you can find information about your WPEngine Install and your WordPress Install.
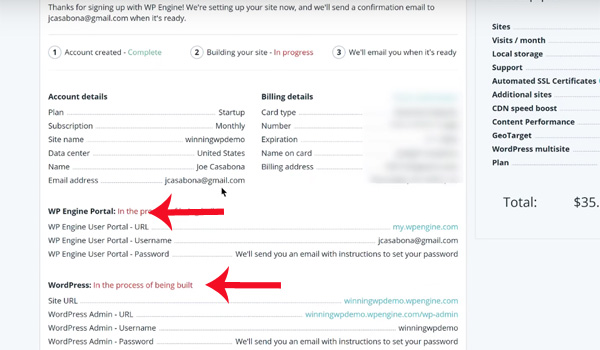
WPEngine Install credentials are to access your WPEngine dashboard, while the WordPress Install credentials are for accessing your WordPress install.
Let’s first access your WPEngine Install.
While you will be provided the username for the WPEngine, most likely your email address, you will need to set up password.
Click the ‘my.wpengine.com’ link under WPEngine Portal section after copying the username under this link (your email address in most cases).
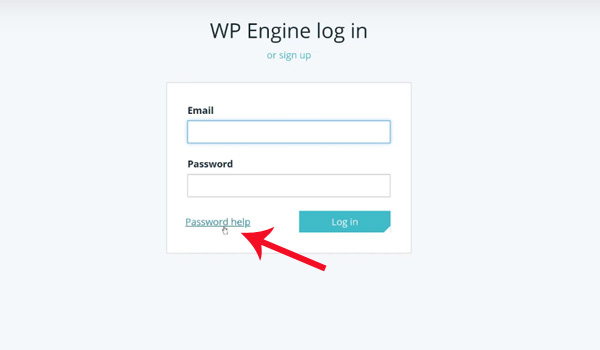
You will be directed to page that you will always use for accessing your WPEngine installation.
On the next page, click ‘Password Help’.
Enter your email address to have instructions about resetting your WPEngine password emailed to you. Click the password reset link that you are emailed and set a new password for WPEngine portal.
Once you are able to access your WPEngine Portal, click ‘Sites’ in the header.

On the next page, click the link for your WPEngine Install next to PROD (production).
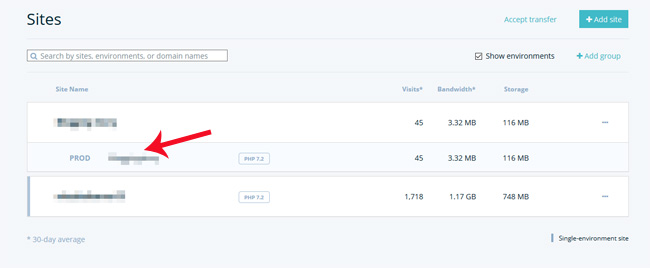
Since you are yet to point the domain name which you purchased from GoDaddy to WPEngine, you will be provided a test domain name by WPEngine.
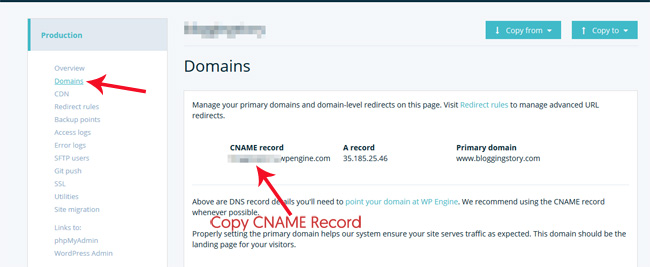
Let’s now point your original domain to WPEngine.
On the ‘Domains’ page in your WPEngine Dashboard, you will find CNAME record.
Copy the CNAME record. It will look something like ‘yoursite.wpengine.com’.
Log into your GoDaddy account.
Next to the domain name which you just purchased, you will find ‘DNS’ under ‘My Products’. Click this box.
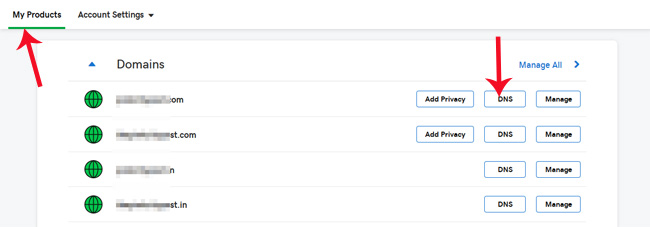
Here you need to update the CNAME record that you copied from WPEngine.
Click on the edit icon for the CNAME record which is already there and the following box will appear.
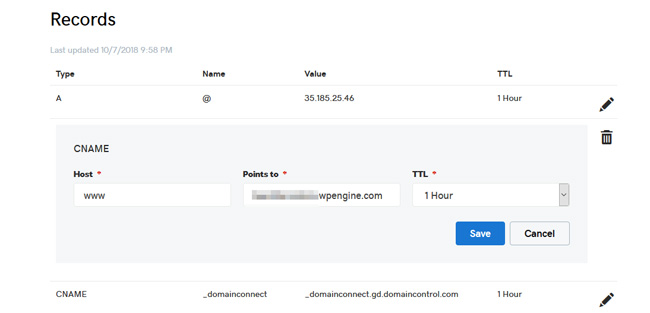
In the Host, add ‘@’ and in the ‘Points to’ field, paste the CNAME record which you copied from WPEngine. Set the TTL to 1 min.
Click ‘Save’.
The CNAME record for the non-www version of your website (i.e. https://yourealestatewebsite.com) has been updated.
You will need to do the same for the www version of your website.
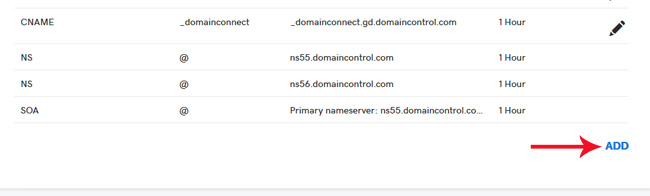
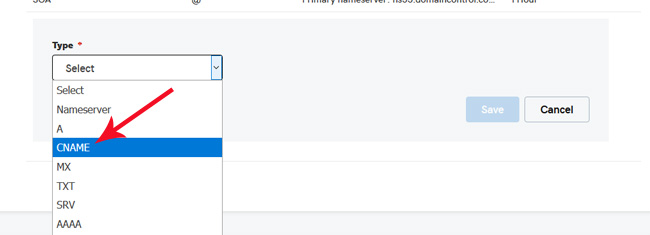
Add a CNAME field.
A box shown in the screenshot below will appear:
In the host filed, put in ‘www’. The Points to field will have the same copied CNAME record. You can leave TTL field as it is. Click ‘Save’.
With this, CNAME records have been updated for https://www.yourealestatewebsite.com also.
Your domain is now pointed to WPEngine.
Go back to WPEngine and on the domain page, scroll down and check if a green check mark is appearing next to the domain name under the ‘Domains and Redirects’ section.
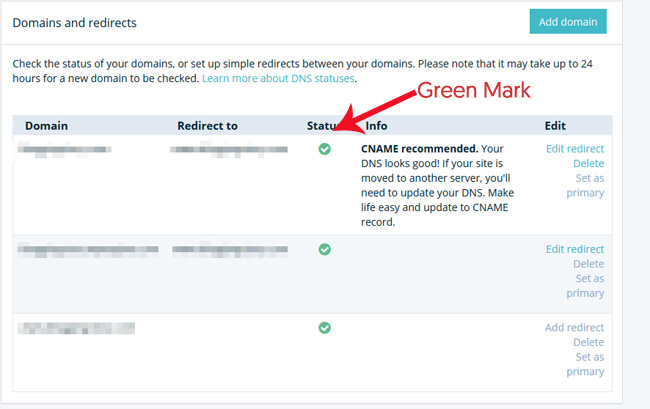
If a question mark is appearing in place of a green mark, click the question mark and then ‘Schedule a Refresh’. It may sometimes take a few minutes, even hours before the CNAMEs are updated and the green mark appears.
You need to add domain names with both www and non-www versions of your website.
Then add a redirect from www.yourrealestatewebsite.com to yourealestatewebsite.com.
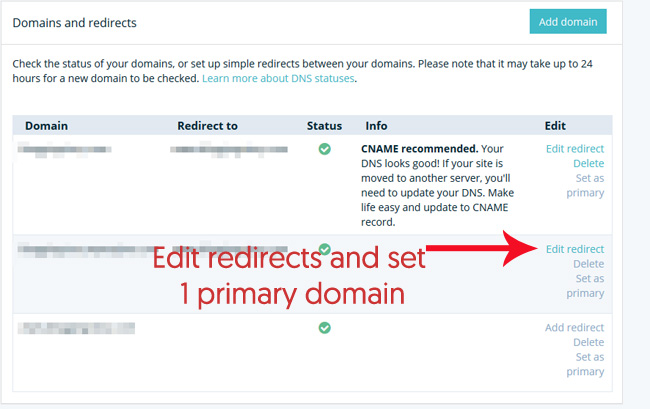
Redirecting www version to non-www version or vice versa will ensure that your website is not penalized for duplicate content. Google considers them two different domains, so make sure that you set up redirect correctly.
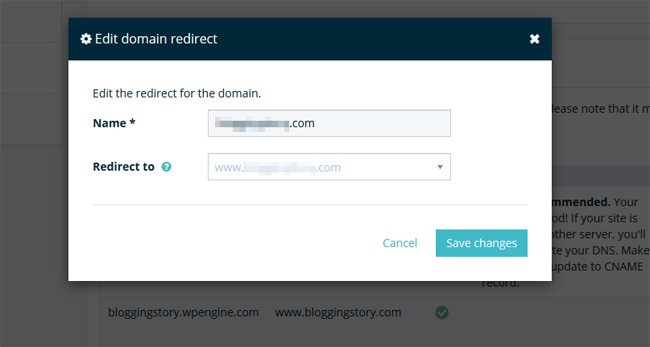
Click ‘Save Changes’ and your WordPress Installation is ready.
You don’t need any additional steps to have WordPress installed. WPEngine does it for you.
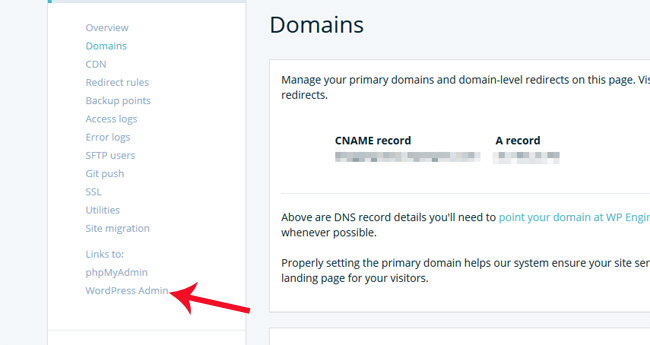
Now is the time to access your WordPress Install.
Click WordPress Admin to access your WordPress install.
In the new tab, click the ‘Lost Your Password’ link and provide your email address.
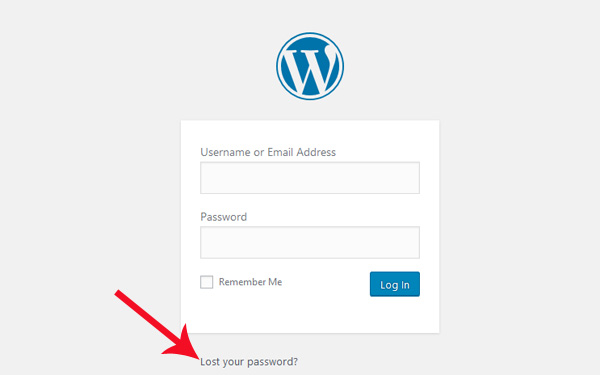
You will get instructions about resetting your WordPress password. Click the link and set a new password. Log in using your email ID/username and password.
-
Add free SSL
The next step is to add a free SSL certificate to your domain.
SSL certificate is necessary for the security of your website.
The websites with SSL certificate begin with https://, while sites that don’t have an SSL certificate begin with http://. Most browsers including Chrome now display a security warning if your site doesn’t have SSL enabled.
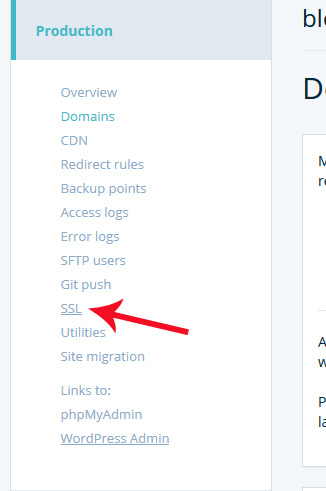
Click SSL on the overview page
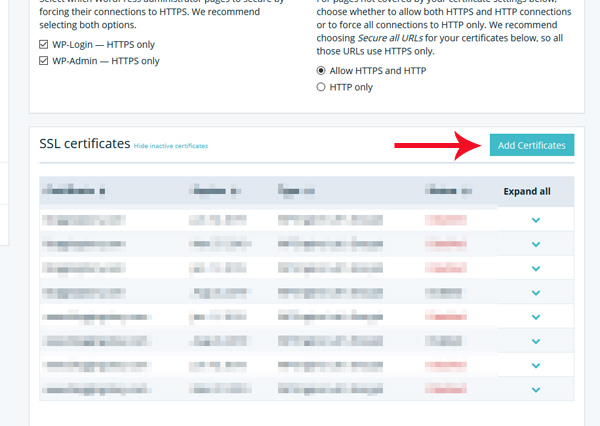
On the next page, click Add a Certificate.
Then click Get Free Certificates and accept the terms and conditions, and Request SSL.
It may take a while for WPEngine to enable SSL certificate. You will get an email when it has been enabled on your site.
-
Add free CDN
As a real estate professional, it is likely that you will upload a lot of images of properties to your website.
Will you want these images to load faster?
Well, why won’t you?
So, your next step is to add CDN which is provided free of cost by WPEngine.
Click ‘CDN’ on the overview page.
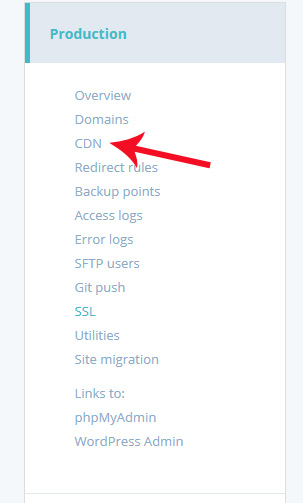
Now all you need to do is click the check mark below Enable CDN and then click Save.
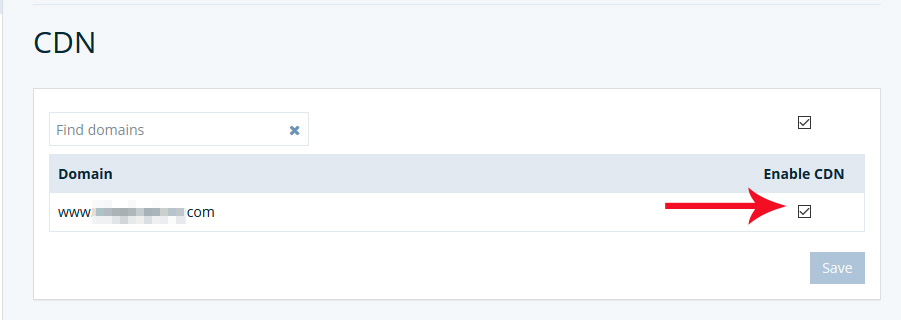
WP Engine will enable CDN for you.
-
Install Genesis Framework and AgentPress Pro theme
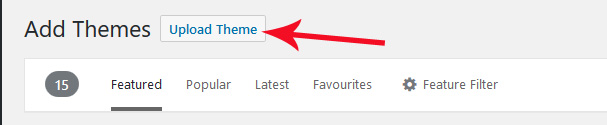
Click ‘Themes’ in the header.
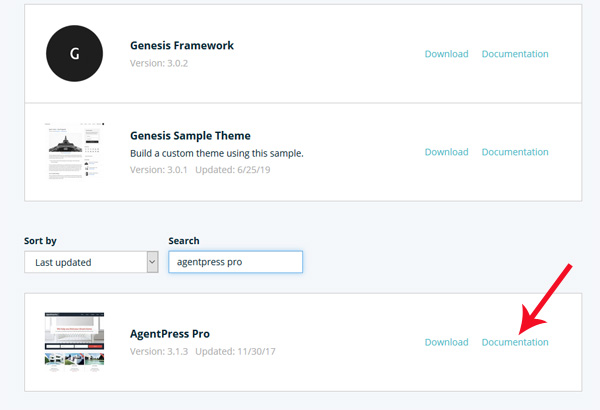
Go to Genesis Framework and click ‘Download’.

Click ‘Save File’ link on the pop up.
The .zip file will be saved in the ‘downloads’ folder of your pc. Copy and paste it on your desktop so that you can easily access it later.
Now go back to Themes and scroll down where you will find all the StudioPress themes which WPEngine provides free of cost. The theme that you need to download is AgrentPress Pro.
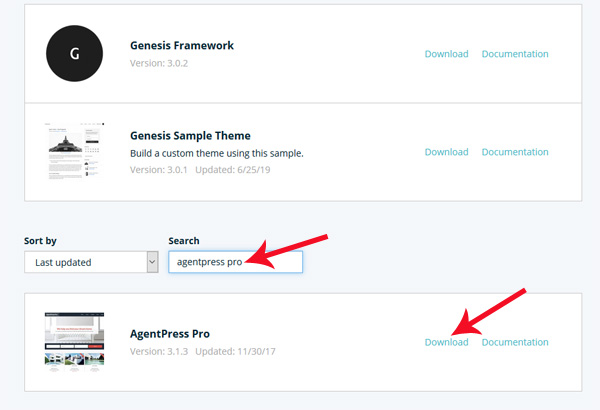
You can check out the demo by clicking on the theme thumbnail.
The demo will open in a new tab. You can change the background image, logo and content easily. I will show you how in a moment.
The next step is to download the theme.
After saving the file in the download page, you should copy and paste the theme .zip file on the desktop just like you did for Genesis Framework.
-
Upload Genesis Framework and Genesis theme
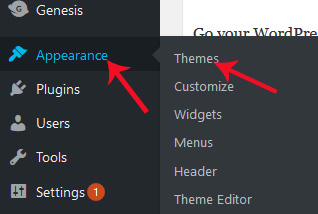
Go to your WordPress Install and under ‘Appearance’ on the left hand panel, find ‘Themes’.
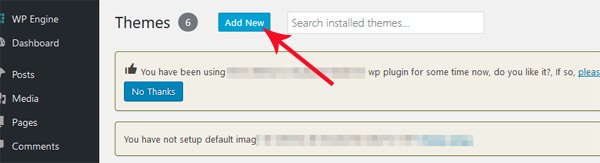
Click ‘Add New’ button on the next page:
Upload ‘Genesis Framework’ and then ‘AgentPress Pro’ theme one by one.
Install and Activate the Theme.
-
Upload Demo Content and customize (Upload logo, change images etc.)
If you are building a brand new website, you should upload demo content in order to make your website look similar to the demo theme.
WPEngine makes it extremely easy to learn how to customize your site. They have provided detailed documentation about how to change each section on the website.
You will find ‘Documentation’ next to ‘Download’.
Make sure to follow all the instructions step-by-step, particularly about uploading sample content. It may be a bit confusing, so you need to follow the instructions very carefully.
The documentation will help you learn the following things:
- Things to consider before installing Genesis Framework and the theme
- How to install and activate Genesis and AgentPress Pro theme
- How to import sample content
- How to change background image, site identity, header image, menus, widgets
- How to follow best SEO practices
- How to create property listings
- Different page layouts
- How to create a landing page
Don’t skip any step and follow them in exactly the same order as explained in documentation.
Build your WordPress real estate website with BlueHost
The process is more or less same. The only major difference is the user interface. A single-click WordPress install and purchasing Genesis Framework and AgentPres Pro theme are among a few extra steps you need to take.
Here is the step-by-step process:
Click here to check out all BlueHost hosting plans.
Click ‘Get Started Now’ and if you are planning to have just one website, you should go for the Basic Plan.

Click ‘Select’ and on the next page, you will be offered a free domain name. Search for your preferred domain name to see if it is available. If you have already purchased a domain name from Godaddy, you can sign up with that domain name also.
For the purpose of this tutorial, let’s sign up with a new domain name.
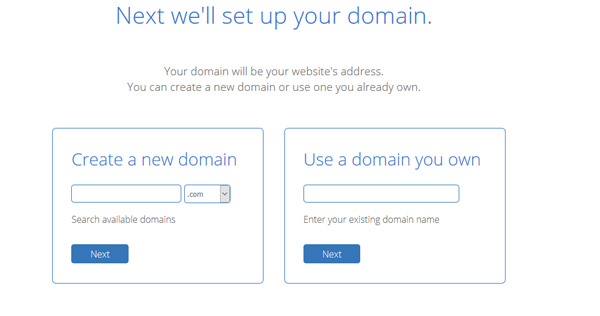
After you have found a domain name that is available, you should click ‘Next’ where you need to fill out your personal details and also pick the hosting plan. You will get the best rate if you pay for 36 months.
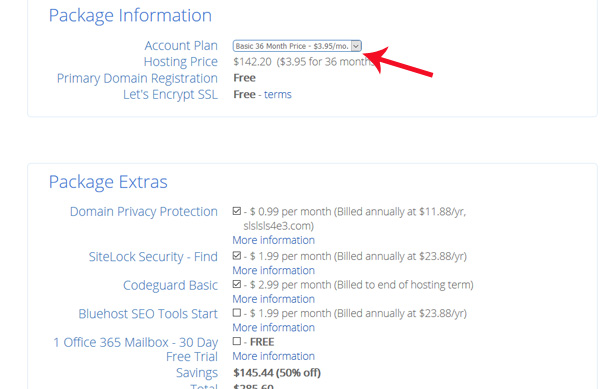
Uncheck all other add-ons being offered by BlueHost and then type in your credit card information. After the checkout, you will land on a ‘Special Offer’ page which you skip by clicking ‘No Thanks’.
On the next page, create a password for your BlueHost account.
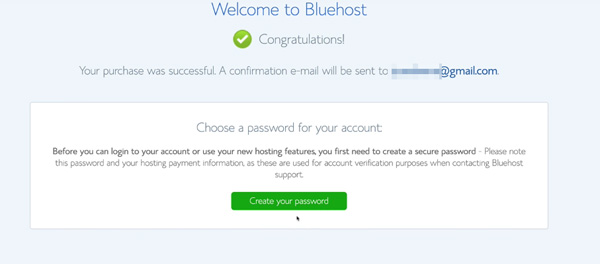
Once you click ‘Next’, your account will be created.
Click ‘Login’.
Once you are in, you need to upload a theme.

Pick any theme for the moment. We will upload AgentPress Pro with Genesis Framework later.
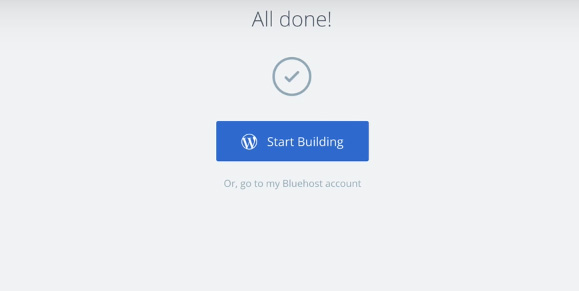
Bluehost will set up WordPress on a temporary domain. It takes Bluehost a while to point your domain to the hosting. The process will happen automatically which means you don’t have to do anything on your part.
Meanwhile, click ‘Start Building’.
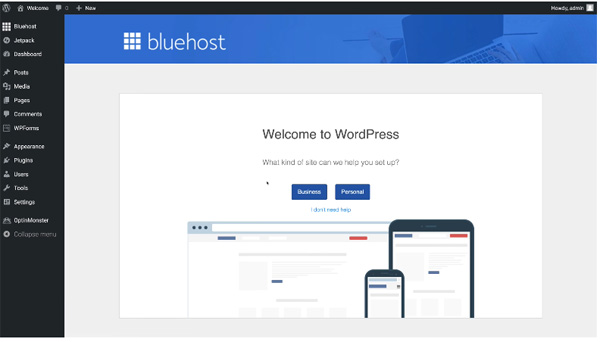
Bluehost will ask us a series of questions to help us get set up.
Click “Personal” site.
Provide site title and site description.
On the next step, you will be asked if you are going to update your site with news or blog posts. Click Yes.
On the next page, you will see “Most recent news or updates” or “A static welcome page”?
Click a ‘Static Welcome Page’.
On the next page, you will be asked if you want to build a contact us page, it is up to you. I would recommend that since you will be installing Ninja Forms plugin to use it with your AgentPro Press theme, you don’t need to build a contact us form here. So just skip it.
You can also create JetPack account for improved security and spam protection. You can also connect your site with WordPress.com. Skip these steps if you want to.
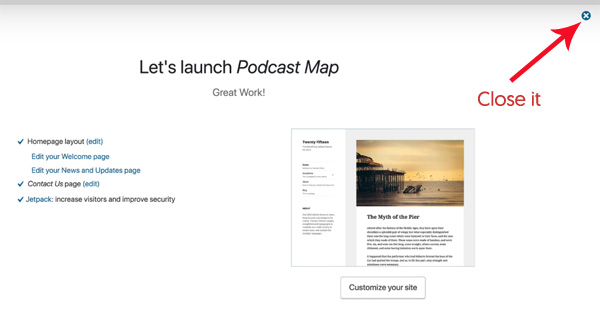
Once you are done with all these steps, you are ready to launch your real estate website on WordPress.
On the next page, you will be asked to customize the site, but close this window.
You will be in your WordPress dashboard. Now it’s time to install Genesis Framework with AgentPress Pro theme.
Click here to go to AgentPress Pro theme by StudioPress.
Purchase the theme with Genesis Framework.
Save the .zip files on the home screen of your desktop and then upload the AgentPress Pro theme as well as Genesis Framework. I have explained in my tutorial on WPEngine how to do that.
Now follow all the steps that I mentioned in the previous tutorial in order to import demo content.
Once you are done, it’s time to launch your site.
Click Bluehost on the left side of the WordPress dashboard. Click ‘Launch’.
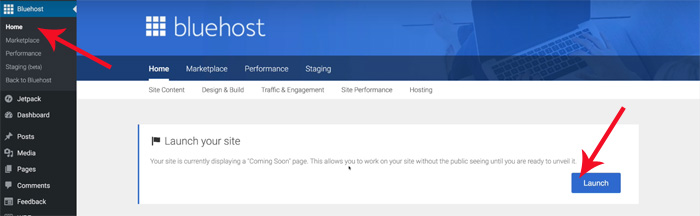
Congratulations, your real estate website is now live.
MLS IDX integration (for U.S.-based realtors)
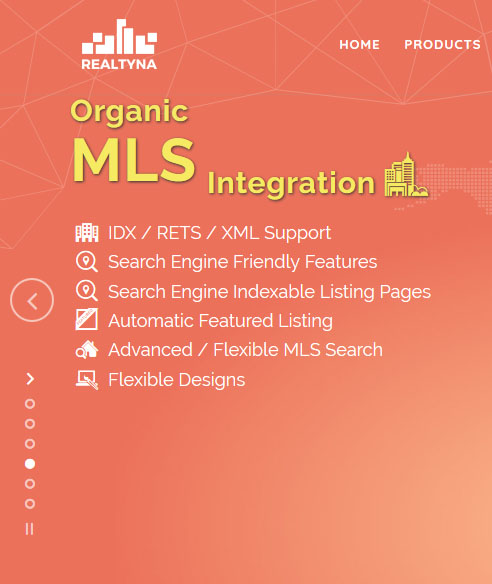
There are many premium WordPress plugins that integrate your real estate website with MLS, but when it comes to making property listings SEO friendly, Realtyna is one of the best and cost-effective solutions.

While Realtyna provides a complete set of integrated WordPress plugins for creating SEO friendly and advanced real estate websites, its WPL Pro plugin is what you would like to install.
Realtyna offers Organic MLS RETS Integration which means that it connects your website directly to the MLS server and pulls the data directly to your website. This is good for SEO because you own the listing content.
To the contrary, an IDX Service Provider (which works as a middleman) will pull data feeds from your MLS provider and will migrate it to your website.
While most IDX providers charge a monthly fee, Realtyna provides organic MLS RETS integration for a one-time payment.
Another great advantage of using an organic MLS RETS integration is that you have a complete control over everything – from your website SEO to design and layout. On the contrary, an IDX provider may limit your access to website database. It means that you will have limited control over the design and development of your website.
Realtyna supports Genesis which means you can easily integrate Realtyna IDX with Genesis. Check out this demo from Realtyna to know how Genesis website with Realtyna will look like.

Once you sign up for Realtyna, their technical team will integrate MLS for you.
Make sure to purchase their Organic MLS integration Add-on.
More steps to building a SEO-friendly real estate web design
Is there such a thing as an SEO-friendly real estate web design?
The way your website is built (coding, site structure, navigation and layout) can have a substantial impact on its prospects of ranking in Google search. These are now some of the most important Google ranking (SEO) factors.
I have seen many real estate investors, real estate agents (realtors) and real estate brokers committing this common mistake: they don’t pay attention to their website’s SEO friendliness. Google certainly doesn’t crawl and index your site based on its beautiful appearance (color, fonts and design).
A great looking website isn’t a guarantee that it is optimized for search engines.
Whether you are buying a real estate website theme or having your website custom designed, make sure that it follows these SEO guidelines:
Choose a hosting service wisely (you get what you pay for)
As a real estate professional, you already know that the foundation is the most important structure in a building.
The moment the buyer finds out that the foundation is weak, the seller is on the back foot on the negotiation table. The cosmetic defects usually don’t matter that much.
Keep in mind that when you are building a website, the hosting service you choose to run your website is the foundation, while your website’s design and layout are the cosmetic features.
Cosmetic features can be ‘repaired’ easily, but if your foundation (web hosting) is weak from the get-go, things may get ugly in the long run.
I have discussed some of the most important things you should pay attention to when choosing a real estate website hosting service in this article (with my top recommendations). I have already explained how to build your website with two of them in this guide.
A good web hosting will ensure that your site loads faster (a huge Google ranking factor) and is protected from malicious cyber attacks and malwares.
Make sure your real estate website follows these HTML guidelines
HTML displays text on a webpage, while CSS and Javascript dictate its design and the web page’s interaction with the user.
Google primarily relies on HTML to crawl and index your website and its pages.
So it is important that the HTML coding on your website is optimized for search engines.
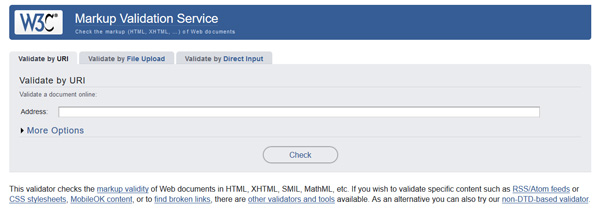
Run various pages of your website including homepage through this official W3C HTML Mark-up Validation tool to find out if there are any major HTML errors.
Consult with an experienced real estate web designer to know how serious these errors are and how to fix them.
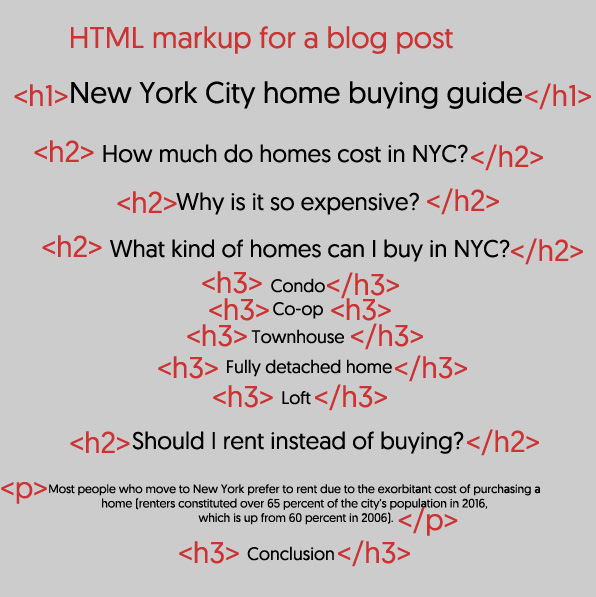
Any page, particularly a real estate blog page, should tag content with HTML5 tags (the latest update of HTML) including <article>, <nav>, <header>, <footer>, and <figure>. The content should be marked with proper headline and sub headline tags. The image below explains it precisely:
Pay attention to the site structure
Make a list of most important real estate keywords you are planning to target with various pages of your website.
These pages shouldn’t be more than two clicks away from the home page.
If the pages targeting your main keywords are 4-5 five level deep from the homepage, you are setting yourself up for a disaster. This problem will be almost impossible to fix when you have published a lot of pages and your site has grown old.
The only option will be to set up hundreds of redirects, a disaster for SEO.
Let’s say for example, ‘buy a home in Rosenberg TX’ is one of your main keywords (because you are a neighborhood expert and work with real estate buyers and sellers in this market).
A good URL structure: yourealestatewebsite.com/buy-home-Rosenberg-TX
A bad URL structure: yourrealestatewebsite.com/buying/neighborhood-guides/ buy-home-Rosenberg-TX.
In fact, you should crate sitewide links for your main pages.
For example, you can build a page with your ‘buy a home in Rosenberg TX’ keyword and then add a link to this in the main menu or dropdown menu in the header and footer navigation.
Studies suggest that sidewide links is a good way of passing ‘link juice’ to the most important pages on a website.
Perform an SEO audit of your real estate website
Once you have launched your real estate website, you should have an SEO audit performed by a search engine optimization professional specializing in real estate niche.
You should make sure that your website is optimized for search rankings and have all the latest search features including Schema and Structured Data Mark-up.
If you want to perform a basic without hiring an SEO auditor, it is definitely possible.
I recently wrote an article on how to perform a real estate website SEO audit without touching code. Just follow the step-by-step process outlined in this article.
Important technical SEO elements your real estate website should have
You will need to work with an experienced SEO professional to ensure that you real estate website has following technical SEO elements:
-
Meta tags
An SEO friendly real estate website has meta title and meta description tags defined for each page.
The title and description are what appears in search engine results.
-
Structured Data Mark Up
Structured Data Mark Up helps search engines understand your content. For example, you can use the mark-up to highlight reviews and rating left by your clients.
Here is how it will show up in search engine results.

In fact, there are many Schema tags specifically meant for real estate agents.
Check out this official article from Schema.org to get a list of all the tags specifically meant for real estate agents and investors.
-
Keyword distribution
This is the trickiest part of optimizing your website for search engines. Even the most experienced SEO professionals don’t get it right sometimes.
For example, your main keyword is ‘buy a home in Houston’. Here is what you should do:
- Make a list of related secondary keywords such as ‘steps to buying a home’, ‘home buying process’, ‘things to consider when buying a home’ etc
- Instead of creating different pages for each of these keywords, create one page targeting your main keyword.
- Include all the secondary keywords in the content of this page with proper distribution (the secondary keywords can be placed in sub headings, conclusion and paragraphs).
- Make sure that the content is comprehensive and easy-to-navigate.
There are two benefits of this approach. You will need to create less content and you will avoid confusing Google.
-
Link structure
As already mentioned, the pages targeting prominent keywords should not be more than two-level deep in the URL structure. It means that the user should be able to reach the page in just two clicks from your home page.
-
robots.txt file
You can tell Google robots which pages of your website they should crawl and which ones they should ignore. This is possible with robots.txt file.
This file is hosted in the root directory of your website. This article from Google explains how to create a robots.txt file.
-
XML sitemap
An XML sitemap is used for telling Google which pages of your website are most important.
You can use a sitemap to tell Google which parts of your site such as author archive and category and tag archive are not to be followed by their robots.
If your website has single author blog section (all the blogs are contributed by you only), you should have the author archive no-followed.
For WordPress website, free plugins such as Yoast SEO can be used for creating an XML sitemap.
-
Canonical tag
If you have two versions of a web page (with same content), you need to tell Google which one it should index. Canonical tag is used for this purpose.
If you don’t use canonical tag in this situation, Google may penalize your website for duplicate content.
According to Moz, a canonical tag (aka “rel canonical”) is a way of telling search engines that a specific URL represents the master copy of a page. Using the canonical tag prevents problems caused by identical or “duplicate” content appearing on multiple URLs.
If there happens to be any crawl error, you can find them in Google Search Console. You need to link your website with Search Console in order to get crawl error and other data related to your site’s performance in search engines.
In conclusion
An SEO-friendly real estate website ensures that the users can navigate to the information they are looking for without any hassles.
User experience is a major SEO factor these days thanks to RainBrain algorithm program of Google. RainBrain relies on user experience (how long they stay on your website and how many pages they browse) for ranking web pages. If users are staying longer on your website and browsing more pages compared to your competitors, this machine learning process will push your content higher in search engine results.
An SEO-friendly real estate website contributes to a better user experience.
If you have any feedback or comments about real estate websites optimized for SEO, let me know in comments.


![2 Best Platforms to Hire Real Estate Virtual Assistant for Realtors & Investors [2023 Update]](https://realtycrux.com/wp-content/uploads/2023/02/fiverr-vs-upwork-real-estate-virtual-assistant-xxlx2kx2-300x144.jpg)
Leave a Reply